WooCommerce Tutorial: How to Install WooCommerce and Set It Up
Figuring out how to set up a WooCommerce store is relatively simple. We’re going to learn how in this WooCommerce tutorial. The plugin holds your hand through most of the process. Even so, you’re going to need some help if this is your first time dealing with payment processors, shipping settings, and more.
Installing and configuring WooCommerce properly the first time around will save you a lot of troubleshooting down the road. The faster you get all your store’s settings right, the quicker you can promote your products and land sales.
In this WooCommerce tutorial, we’ll walk you through five steps to set up a barebones WooCommerce store. This is part of a series that’ll show you everything that WooCommerce has to offer, including how to publish products and much more.
WooCommerce tutorial: How to set up a WooCommerce store
Here’s a high-level look at the process:
- Install the WooCommerce plugin
- Select payment gateway(s)
- Set up WooCommerce shipping zones
- Install recommended extensions
- Verify that core pages are functioning
Step 1: Install WooCommerce
If this is your first time setting up an online store, we recommend you start with a clean WordPress installation with a default theme and no other plugins. This will minimize the chances of any compatibility issues with WooCommerce down the line.
The first thing you’ll want to do is set up WooCommerce itself. To do that, access your WordPress dashboard, move to the Plugins tab, and select Add New:

On the next screen, type WooCommerce into the search bar. Once the plugin comes up, click on the Install Now button:

When it’s ready, you can click on the Activate button. As soon as that process is complete, WooCommerce will launch its configuration wizard, which will help you set up your store’s key settings.
It starts with some basic questions about your store:
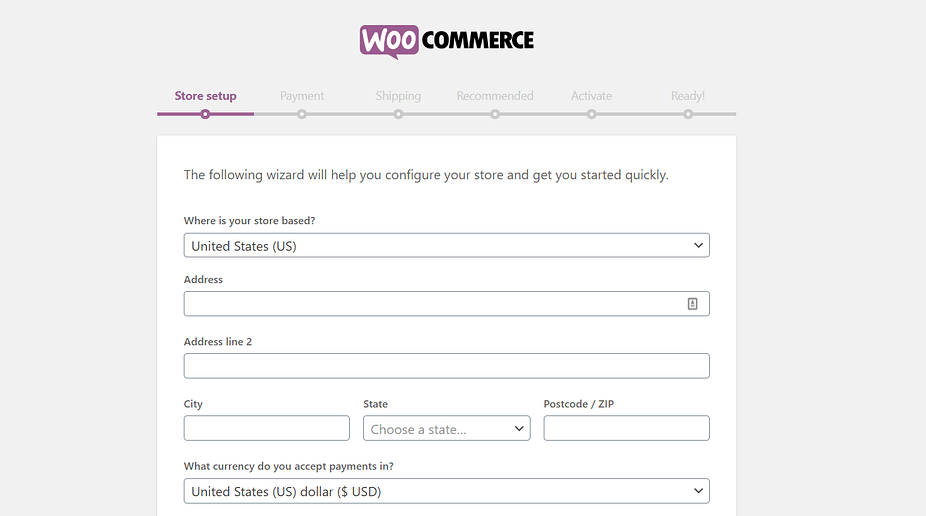
You’ll want to specify where you’re located, what currency you want your store to use, and what types of products you want to sell:

Once you’ve filled in each field, click on the Let’s go! button.
Step 2: Select your payment gateway
Next, you can select which payment processor you want your store to use. Out of the box, WooCommerce supports Stripe, PayPal, and offline payments:

You probably don’t want to deal with offline payments, so let’s focus on the other two options. WooCommerce will set up plugins to enable integration with whichever gateway you choose. You can use one, both, or neither. If you go with that last option, you can set up an alternative platform later.
Both Stripe and PayPal are good options, so you won’t go wrong with either. We have a post dedicated to the best payment gateways for WooCommerce if you need some help deciding.
Select the options you want now and then move on to the next page. You’ll configure the rest of your payment settings later.
Step 3: Set up your shipping zones
After payment processing, it’s time to configure your store’s shipping settings. WooCommerce will ask which ‘zones’ you want to ship products to and what rates you want to apply:
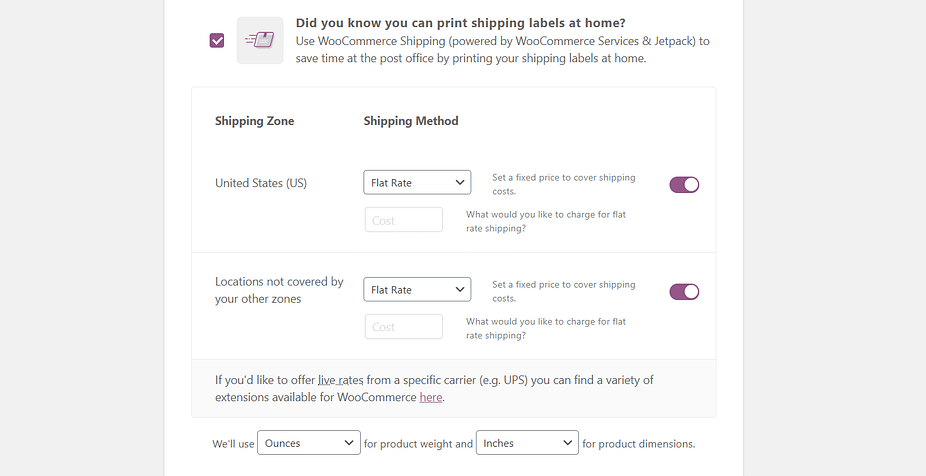
A shipping zone is simply a geographic location you want to apply a particular delivery rate to. For example, you might offer price rate within your state or province, another within your country, and third for international sales.
How much to charge for shipping depends entirely on what zones you want to cover and the products you’re going to sell. If you’re not sure what to charge yet, we recommend checking your local post office’s rates. Plus, you can always change these numbers later.
International shipments can become complicated, so we also recommend you start local unless you already have experience in this area.
Finally, WooCommerce offers you the option of using its Shipping extension to print labels at home and save time. It can be a nice efficiency booster, so it’s worth considering.
Once you’re done establishing your shipping zones and rates, hit the Continue button.
Step 4: Add recommended extensions
WooCommerce itself is a full-featured eCommerce solution. However, you’ll almost always want to extend its functionality with additional plugins.
Right off the bat, WooCommerce recommends a few options that can be useful for a broad range of online stores:
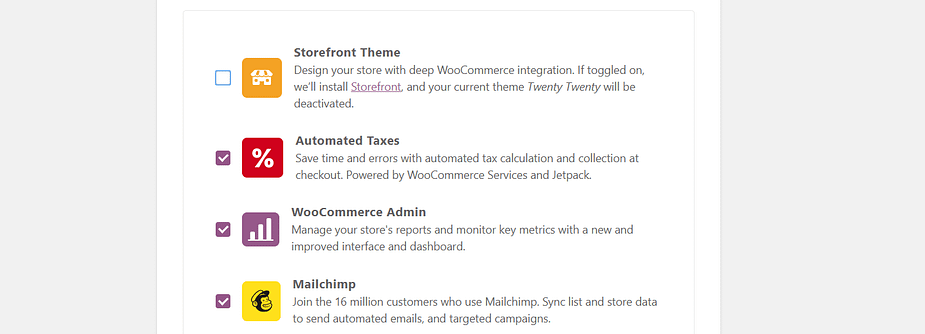
You’ll notice that WooCommerce recommends you install a specific theme. For now, it may be better to stick with a default. Then you can shop around and find a WooCommerce theme that fits your branding. Until you decide which one to use, disable this option.
Other recommendations include the plugins Automated Taxes, WooCommerce Admin, and Mailchimp. The Automated Taxes extension can save you some administrative work, so it’s a smart move to activate it.
Likewise, we recommend you set up WooCommerce Admin, which offers streamlined reports and analytics for your store. Whether to use Mailchimp or not, however, will depend on what email marketing platform you want to use. If you haven’t chosen one yet, disable this option.
When you’re ready, move on to the next screen. WooCommerce will automatically set up the plugins you selected in the background. Before you continue to the last step, the wizard will ask whether you want to connect your store to Jetpack if you enabled Automatic Taxes.
For Jetpack to work, you need a WordPress.com account. WooCommerce will prompt you to connect to WordPress.com and create an account if needed.
Step 5: Check that everything is configured correctly
At this point, you’ve made it to the end of the WooCommerce configuration wizard. Now you can get to work on publishing your first products. Before that, however, it’s wise to check that everything is working correctly.
There are several pages every online store needs, and WooCommerce automatically generates several of them for you. To check them out, visit your website and look for your Shop, Shopping Cart, and Checkout pages:
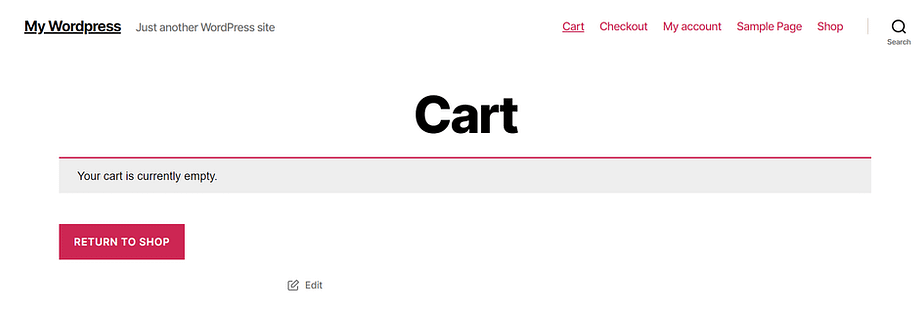
Since this is a barebones WooCommerce installation for now, there’s still a lot of work to do before you can sell your first products. However, the foundation is there.
If you want to make further changes to your WooCommerce settings, you can do so from the WooCommerce > Settings screen. Here you’ll find options to change your tax, shipping, payment, and email settings:
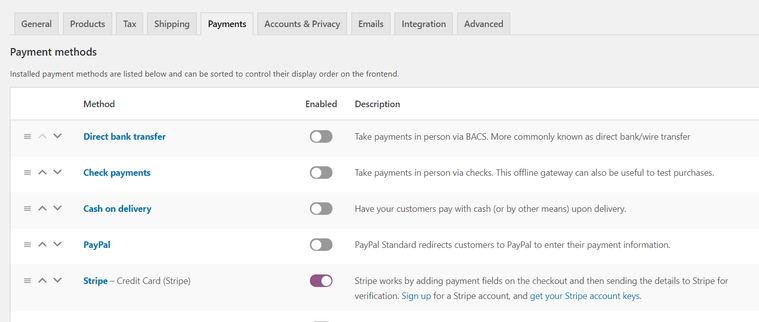
Be sure to hop over to Payments and click on the Set up button next to the gateway you selected earlier. Here, you can finish configuring it. For example, if you want to set up PayPal, you’ll need to enter your email and identity token:

Check out these guides on how to configure each payment processor WooCommerce offers out of the box. Once that’s done, your store is ready to start processing sales.
WooCommerce tutorial conclusion
There are a lot of steps to setting up an online store. The advantage of using WooCommerce, and by extension WordPress, is that they become much simpler. With this popular plugin, you’ll gain access to a configuration wizard that guides you right up until you’re ready to publish your first product.
Here are the steps you’ll need to cover to set up a barebones WooCommerce store:
- Install WooCommerce and access the setup wizard.
- Select your payment gateway.
- Set up your shipping zones.
- Add recommended extensions.
- Check that everything is configured correctly.
Now that you have your basic store set up, you’re ready to start adding products.
Do you have any questions about how to set up a WooCommerce store? Ask away in the comments section below!
